
According to DMA and Demand Metric, email has a median ROI of 122%, which is over 4x higher than other marketing formats including social media, direct mail, and paid search.
Almost 90% of all marketers agree that email marketing is their primary channel for lead generation but how email marketing is being utilized has changed completely.
Efficiency is at the core of today’s email marketing strategies, with dynamic and automated campaigns taking a leading role.
Contents
- Automated Email Campaigns – The Nitty Gritty
- Setting Up Automated Flow Campaigns
- Looking at the Logic
- Effective Email Templates
- Creating Killer Subject Lines
- Creating Compelling Email Copy
- Klaviyo – A Practical Example
Automated Email Campaigns – The Nitty Gritty
To recap, automated email campaigns use segmenting protocols to send out specific emails to customers based on user behavior or characteristics.
Unlike standard segmenting that requires you to create a unique email for each client segment, automated emails only require you to create one email that will be sent to users who meet certain criteria or take specific actions online.
Automated emails can also be personalized by pulling through dynamic content that’s unique to each client.
For example, when a customer abandons their shopping cart, instead of having to create a unique email for that customer that includes their name and the products they added in their cart, you can create an automated dynamic email that pulls all of that information through for you and is triggered when customers abandon their shopping carts.
Your customer relationship management database is going to be essential for developing and sending out automated dynamic email campaigns. It’s, of course, also critical that you have a thorough understanding of the customer journey so that you can create the right types of emails and send them at the right times.
A batch email approach is no longer an effective tactic, with more users expecting a more personalized experience with brands at every touch point.
One of the key benefits of automated email marketing is that it uses contextual marketing. This means that your brand is connecting with users at every stage of the customer journey and not just at the point that they’re ready to convert.
Setting Up Automated Flow Campaigns
Automated flow campaigns, or email drip series, are groups of emails that are geared towards the different stages of the conversion process and follow a logical flow.
In order to ensure that you’re reaching customers at multiple points, you will need to define and create various email flows with the aim of eventually getting customers to make a purchase.
Each flow will need to have a different goal and will be triggered according to specific criteria, with each email pulling through unique customer information that will help personalize it.
Before you start developing your email flows, it’s important to lay the correct foundation. Spend time mapping out the emails that you feel would be relevant to a user during the buying process. This process will provide you with a high-level overview and you may find that you can actually eliminate certain emails, saving you time and effort later on.
If you can’t link each of your email flows to a particular goal, it shouldn’t be included. Linking emails up to goals will also ensure that your emails aren’t overlapping.
How many flows you decide to create is dependent on your goals and your unique customer journey. Emails flows can be linked to anything from shopping cart abandonment and newsletter subscribes to encouraging customer loyalty or the completion of lead generation forms. You can also choose to include more than one email in any given flow if you want to reach out to customers about something more than once.
Simply put, your flows are meant to bring customers back to your website so that they can complete an action and convert.
Looking at the Logic
The key to creating an effective series of automated email flows is getting the logic right.
When there’s no logic behind your email flows, you could end up sending out conflicting messages to clients, which could affect your conversion rate. To begin the creation of your flows, you’re going to need to define your email triggers.
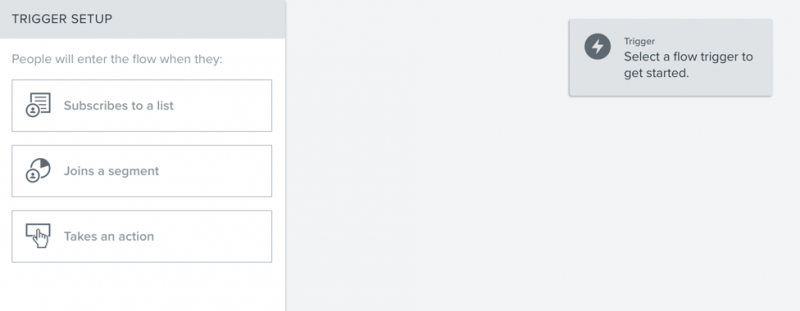
There are generally three types of email flow triggers:
- Metric or Action. When a user takes a particular action on a website or within an email, an email will be triggered. Examples of actions include abandoning a shopping cart or clicking on a link in an email.
- Manual. Manual triggers are linked to specific lists or segments. For example, customers signing up to receive special offers would be an example of a list, while female users who have recently purchased a baby product would be an example of a segment.
- User information. Triggers can also be linked to specific user information such as location or date of birth.
After you’ve defined your triggers, you can start setting up your flows and filters.
Filters ensure that your emails are only being triggered when a user meets all the criteria for receiving that email.
For example, say a customer abandons their shopping cart. In an effort to not lose that sale, a Cart Abandonment email is triggered.
As an extra precaution, you’ve also setup a second Cart Abandonment email that will be sent again after 24 hours. You, of course, don’t want this email to be sent to a user if they do happen to complete their purchase between the first and second Cart Abandonment emails being sent, this is where filters come in handy.
Filters make sure that emails are only being triggered when very specific conditions are being met. You will probably spend the most time on filters when setting up your email flows as you have to think of absolutely every possibility in order to ensure that you aren’t sending conflicting messages at the wrong time.
Examples of filters that might come in handy include:
- Making sure a customer has not bought any product within the time frame that the specific automation has been running
- Making sure a customer hasn’t received an email from you moments before or even within the last day
- Prioritizing automated email sends – The abandon cart email should be triggered first, then the browse abandon email. This will ensure that the customers who are most willing to purchase from you get the most relevant email at the right time
Effective Email Templates
Now that you’ve outlined the email flows that you want to create and have defined the logic behind them, you can start looking at the design of your emails.
Most email marketing platforms such as Klaviyo will provide you with ready-made templates that you can use or the ability to design your own templates from scratch.
Below are a few things to keep in mind when designing your templates:
- Mind the width. In order to keep things mobile-friendly, the width of your email shouldn’t be more than 600px
- Images don’t always display. There is a chance that your images won’t display so it’s best to add in background colors and alt text
- Choose images carefully. Only use unique, high-quality images in your emails to make them look less generic. One or two images are generally enough though, especially since a lot of email clients won’t automatically display images so text is a lot more important
- Get to the point. Keep your copy to a minimum and only give readers the information they really need, especially in the areas of your email that will show above the fold
- Tell them what to do next. Always feature a strong, prominent call to action to encourage engagement
- Be CAN-SPAM compliant. In order to meet CAN-SPAM Act requirements, you will need to give users the opportunity to opt out of your communications so be sure to insert a highly visible Unsubscribe link in the footer of every email so that you don’t damage your deliverability and reputation
Be sure to test your email templates on as many email clients as possible to make sure that there aren’t any issues with the design.
Creating Killer Subject Lines
Once you have created an email template that you’re happy with, you can move onto your email copy, starting with the subject line.
Here are a few guidelines for creating email subject lines that work:
- Keep it short. It’s recommended that your subject line should be between 30 and 50 characters
- Make it urgent. If possible, convey a sense of urgency
- Watch your wording. Stay away from spam trigger words such as ‘As seen on’, ‘call now’, and ‘FREE’. You can find a comprehensive list of no-no words here
- What’s in it for the reader? Your subject line should convey value. What will the reader get by opening your email?
- Benefit from dynamic tags. In order to change things up, you can also personalize your subject line using dynamic tags
- Numbers work well. Create a break in words by using numbers in your subject lines
- Just ask. Encourage more engagement by using questions as subject lines
Once again, the number one rule for finding subject lines that work for your specific audience is to test and test again.
There is also a second part to your subject line: Preview text.
Your preview text tells users more about the content in your email but if you don’t create your own preview text, email clients will pull through the first sentence of your email and use that instead.
This is generally fine but if the first sentence of your email isn’t compelling, you could be wasting an opportunity to further entice a recipient to open your email. Your email’s preview text could be anything from 35 – 140 characters so make those first few words count.
Creating Compelling Email Copy
If you’ve gotten a subscriber to open your email, you’re one step closer to a conversion. Your copy is the final piece in your email puzzle and could mean the difference between a sale and an email being deleted.
Here are some helpful tips for developing email copy that converts:
- Make it personal. Start your email with something personal such as the recipient’s name to make the email more relevant to them. Dynamic tags can be used for this
- Use pronouns. Orientate your email copy to your reader by writing in the second person using pronouns such as ‘you’ and ‘yours’
- It’s all about the benefits. Your readers do not want to hear about your product’s features and why your brand is the best in your industry, they want to find out how they’re going to benefit and what you can do for them. Be sure to create your copy with this in mind
- Make it scannable. You do not need to fit your entire brand history into an email. Your copy needs to be scannable and should highlight the benefits to the reader
- Add a touch of personality. This is the chance to let your brand’s personality shine through so incorporate your unique voice into your copy in order to make it a pleasurable reading experience
- Tell them what to do next. Don’t forget to insert a clear call to action!
A Practical Example
There are several great email platforms out there that can be used to set up automated email campaigns but today, we will use Klaviyo to give you an example of how this is done:
Importing Contacts
Whether you want to import your contacts using a CSV file or directly from your previous email service provider, Klaviyo makes it very easy to transfer your current email database.
The Integrations tab in your account will allow you to import contact names, email addresses and all historical data from the following ESPs:
- MailChimp
- Constant Contact
- Exact Target
- Campaign Monitor
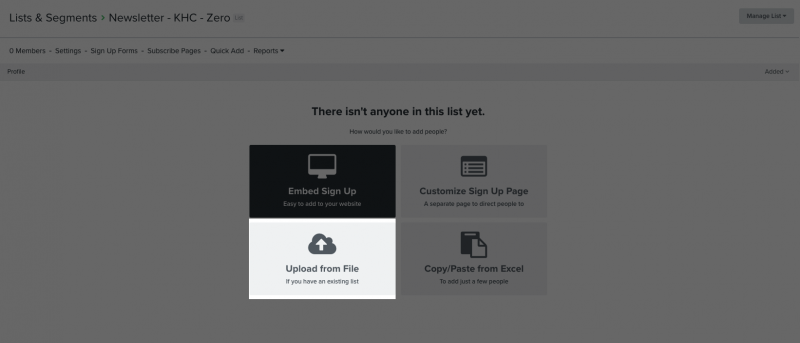
If you aren’t using any of the above services, you can simply format and import a CSV file. Upload your CSV file by clicking on Lists and Segments and Create List/Segment.
Other third-party integrations
In order to offer businesses a more integrated marketing experience, Klaviyo has partnered with several great platforms, including:
- Shopify
- Zoho
- 3dcart
- Amazon.com Marketplace
- Justuno
- Eventbrite
- And More…
These various integrations ensure that brands can reach customers at more touchpoints and drive more conversions. These platforms can be integrated with one click and will generally only require a URL or API key in order to link it to your account.
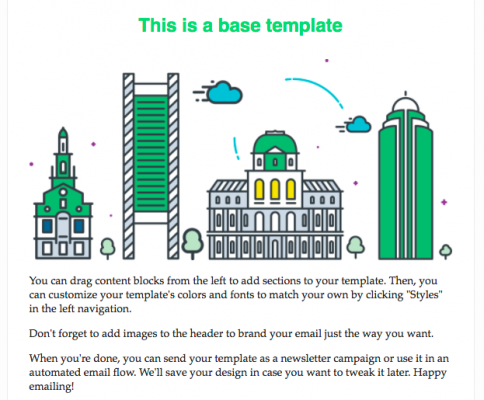
Building an Email Template
- Navigate to the Emails Templates tab and click Create Template
- Choose a pre-designed layout in the Themed tab or you can start with a blank template
- Custom HTML templates can be imported using the Import tab
- Keep in mind that you can still customize the pre-designed layouts if you want to use them as a starting point
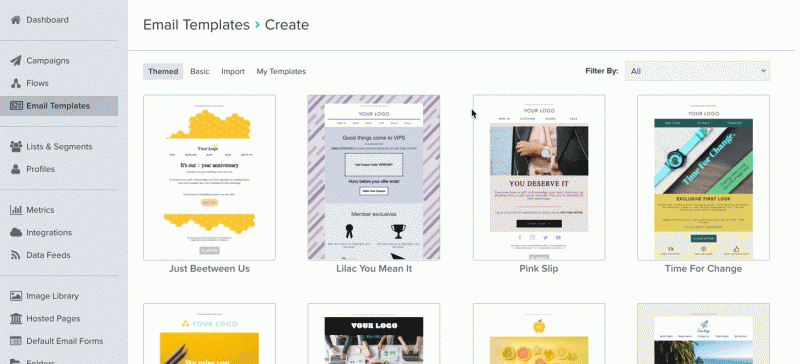
- Give your new email template a descriptive name and click Create Template
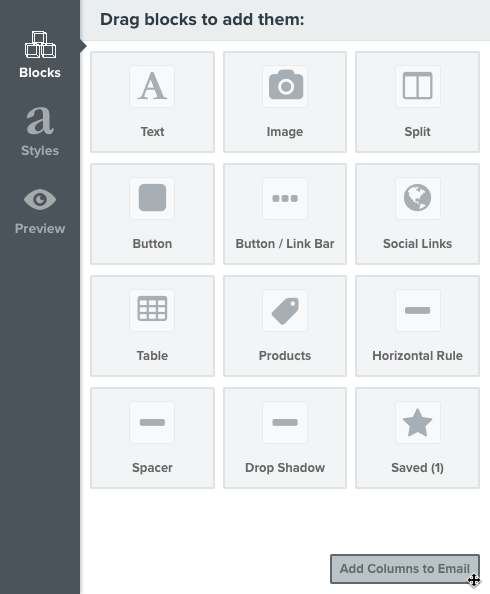
- The template editor will let you use a drag and drop functionality to edit your template and make it your own
- Add preview text to the top of every email template to ensure that users are seeing a good secondary subject line
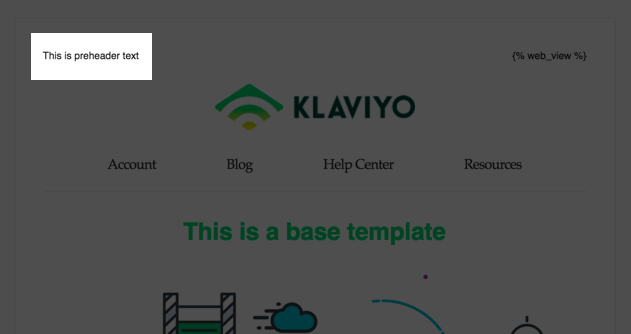
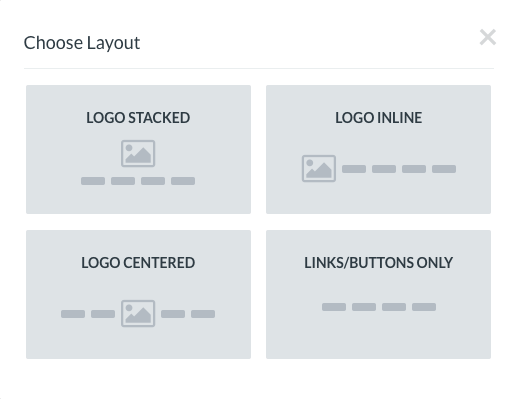
- The header bar will allow you to add your logo and your navigation to the top of every email. It’s best not to use a logo that has a height of more than 150px to avoid pushing too much of your content below the fold. You can choose from 4 different header layouts
- Use text and images blocks to start building the body of your email. You can also add elements such as Product Blocks that pull through product catalogs, buttons that will allow you to insert a call to action and dynamic tags that will help pull through personalized information for each recipient.
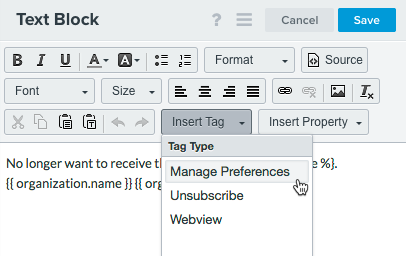
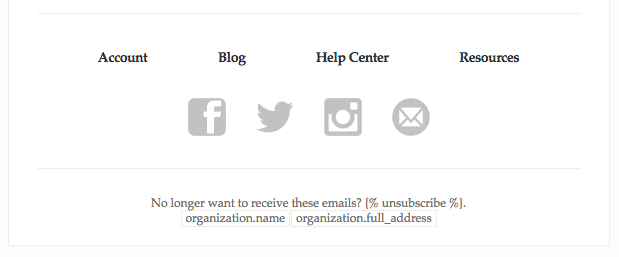
- Your emails footer is where users will expect to find links to unsubscribe or manage their preferences. Klaviyo has tags that you can use to insert these links. Your footer is also a good place to include links to your social media accounts.
Automated Flow Creation
- Clicks on the Flows tab to create a new flow. Give your flow any name that you feel is most relevant
- You will then be prompted to select the most relevant flow trigger before selecting an email list or customer segment to link to the flow. If you select Takes an Action, you will be prompted to select an event metric to trigger the flow. You will then have the opportunity to add one or more filters to that action.
- From there, you can select an email to link to this particular flow. Drag the email onto the visual canvas
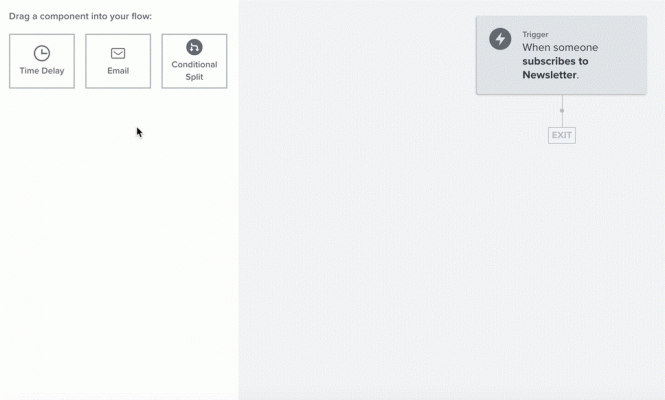
- If you will be adding more than one email to your flow, you will need to add Time Delays to the mix to prevent them from triggering all at once. Your delay can be based on hours or minutes or even days
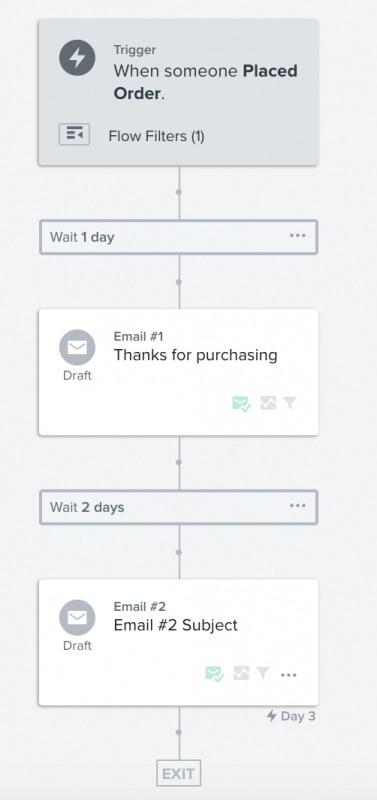
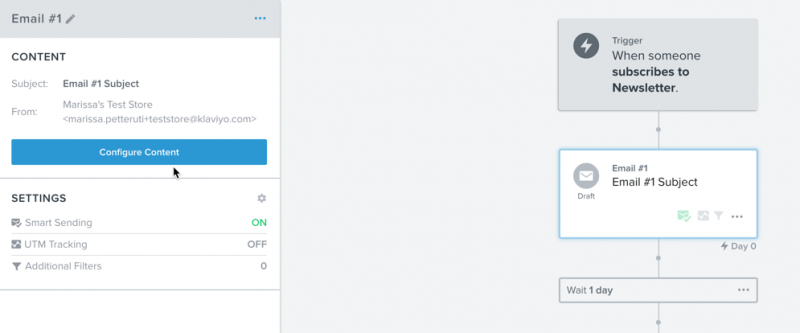
- You can now configure the content of your flow emails by clicking on the email card and clicking the blue Configure Content button. This will allow you to update the sender information, add a subject line and insert content in the same way that you did when setting up a campaign.
- You can now change the status of your flow to Draft, Live or Manual. Manual flows won’t send automatically and need to be manually reviewed and scheduled. Live flows will send automatically when a recipient meets the specified criteria.
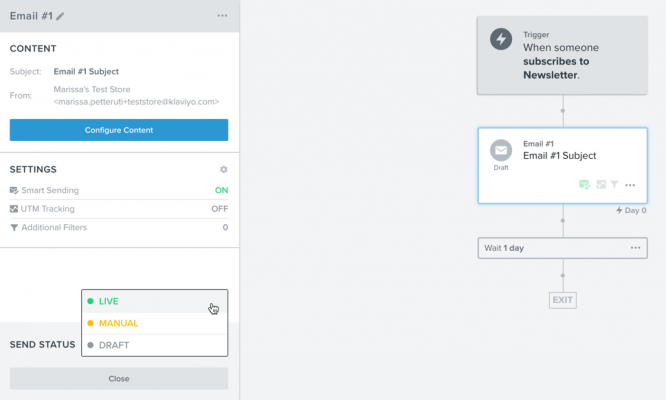
- The next step will be to add trigger and flow filters to your email flow. An example of a trigger filter would be to target someone who orders a specific product. A flow filter, however, targets users who meet specific criteria and took a specific action. A person who ordered a certain product and lives in Canada would be an example of a flow filter. Multiple filters can be added to an email flow.
Dynamic Content Creation
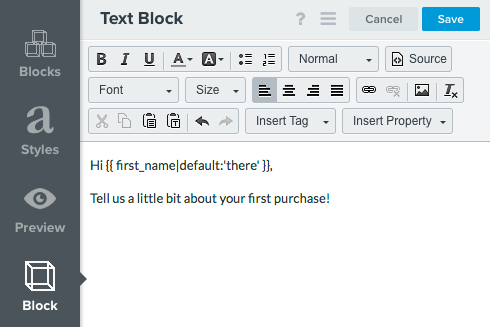
- Personalize your automated email campaigns by adding in dynamic content such as a recipient’s name. When editing your email template, click on the Insert Property drop-down menu and select the property that you want to insert.
- If you’ve added extra properties to individual contacts in Klaviyo, you can use them as dynamic content in an email with the person variable and the lookup filter.
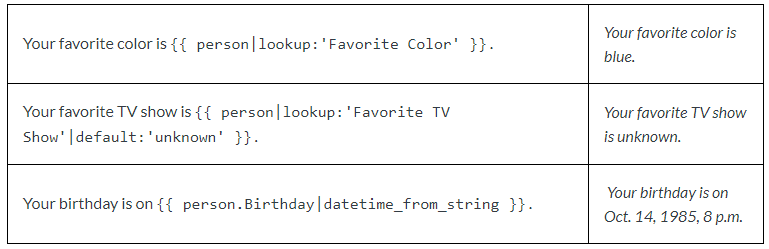
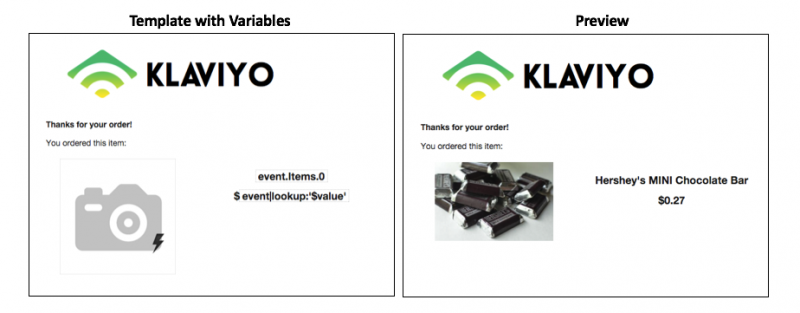
- Event variables can be used to pull through specific product information based on what a user just purchased, left in their cart or was viewing on your site. Klaviyo automatically stores detailed event information for you so that you can use the appropriate variable to add dynamic event content. The information captured is specific to each metric.
While dynamic email campaigns do have a lengthy setup process, once your templates, flows, triggers and filters have been added, you’re one step closer to creating highly-effective campaigns and flows that will offer your customers a more personalized brand experience and send a lot more conversions your way.
Want to see what Klaviyo can do for your brand? Sign up for a free trial here.
At CoolCat Digital we believe in excellence and we believe in delivering results. For any inquiries or consultation please feel free to CONTACT US.